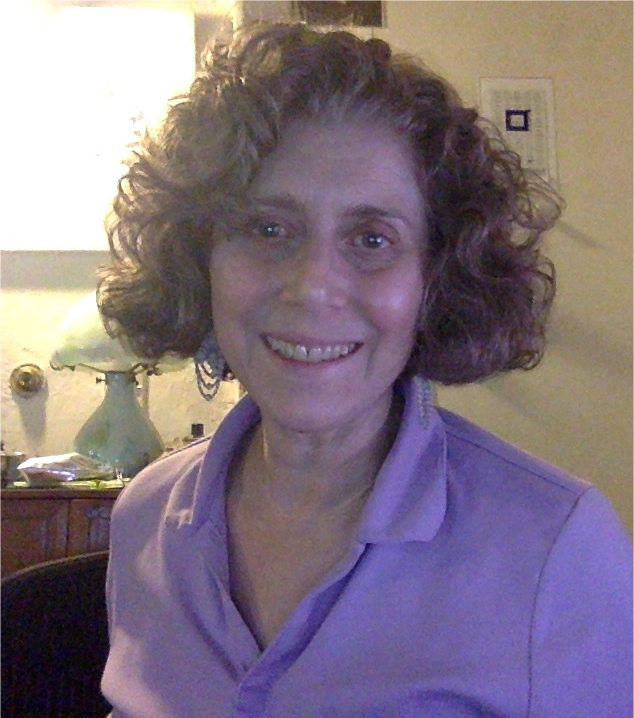
I’ve been cutting my own hair for years, with varying success. It started as a way to save money, and then became something I just wanted to learn how to do – seemed like I should be able to do. It usually ended up an all-day project. But I found a new method, and this morning I was able to cut my hair into a medium length, gently layered bob in just five minutes. Here’s a pic – I think it came out well! Here’s how you do it.

Note that you must use professional haircutting scissors (very sharp) that you use for no other purpose. Otherwise it will look like a rat gnawed off your hair.
First I washed my hair, put conditioner in it, and left it on (to maximally straighten my curls during the cut). I combed my hair into a pony tail at the nape of my neck (as evenly as possible – side hair on side, back on back, top on top), and tied it with an elastic – not hard up against the nape of my neck, maybe an inch away. And then I cut off the pony tail. I tried to make a fairly even cut, but I didn’t spend a lot of time obsessing on it – total time, 1-2 minutes.
Next I took off the elastic, turned my head upside down, combed my hair up into a pony tail on the very top of my head as evenly as possible (side hair on the side, back hair on back, etc.) and tied that with an elastic. Then I combed the pony tail straight up from the top of my head and blunt-cut it straight across – just a little (about 2 inches) for long layers. Total time for this, maybe 2-3 minutes.
Then I jumped back in the shower to rinse out the conditioner. Done!
Now I have a perfect bob, a bit shorter in the back (as is the current style), and slightly layered so my curls curl. It’s my best haircut in years – in or out of a salon – and I can’t believe how quick and easy it was.
My big mistake in the past was to try to cut my own hair using the techniques that a salon stylist would use. You just can’t do a good job of that on your own head – there is always the problem of the back. There are tricks to cutting your own hair, and they are different from what you do if you’re cutting someone else’s hair!
As you can see, my hair is naturally curly. Judging from my internet research, this technique will work equally well on straight hair, but of course I don’t have straight hair to test it on. If you do, please post your results!
Edit (12-Apr-2015):
In my original post, I didn’t write about trimming the front after the two ponytail cuts. My hair was so short to begin with, it wasn’t necessary. But now I always do this. I part my hair in the center, then trim the front to match the back. Otherwise it’s too long in front. I also check that both sides, left and right, are equal length in front. Because I’m right-handed, I tend to cut the left side longer. This post-shower trim takes me about 5 minutes.
This is yesterday’s haircut – trimmed in front as described above.
Sorry, sandelf – that would require someone coming into the shower with me with a camera. No can do.
this is fantastic. I love the idea of cutting my own hair but I’ve always been too chicken. I hate spending money, time and again, for bad haircuts. I just got another one, and I’m going to try to correct it with your method, doing only the back since the top is already too short.
Question, I’m not sure what people mean by Triangle Head. My problem with bad haircuts on my wavy bob length hair is they are too wide on the bottom because there’s too much fulness there and the top layers are too short; is that what people are referring to?
thanks so much for your inspiring blog.
I have curly hair that morphs into a wavy mess when it gets too long. Today I decided that I needed to get it cut. Recently a roommate of mine decided to chop her long hair (it was down her back) into a bob. She did the initial slice and then had me clean it up and shape it. It looked fantastic and she was very happy with it. Recalling this I decided to do it myself rather than fork over upwards of 40$ to get it done at a salon. I searched around online, read your article, and ran upstairs to try it out. It was so simple and looks great! I cut only an inch at first and once I let my hair dry I saw that I could get a little bolder and shorten it up some more. I repeated the process and am thrilled with the results. I may shorten it up again in a few days. I want to get my roommate’s opinion (she will be shocked since I am not typically an “impulsive” person). Thanks for advice 🙂
I have always had thick, curly hair.
With menopause, coloring it every 5 weeks and a thyroid condition, my hair has thinned out to almost nothing! When it gets longer, it just stretches out straight and lately I have really been feeling like a hag! I was desperate. I once had a wonderful stylist who knew how to cut my hair perfectly, but when he moved away, I was just never able to find anyone who could do the miracles that he always could.
I finally decided that I would bite the bullet and go pay big bucks for someone to do it THEIR way and then go home, wash it all out and try to fix it myself. I found your article here and voila! I DID it just the way you said and WOW! I am so happy with this! I actually had my husband do the cutting, since I couldn’t grasp my thin little shock of hair, which was loaded with conditioner. He cut it within 30 seconds for the ponytail at the bottom and then another 30 seconds for the top! UNBELIEVABLE!!! I am thrilled! THANKS so much!
I would like to send pics, both before and after. How can I do that?
The best haircut I ever had was by a Japanese hairstylist who used this method. I have straight hair and he cut while wet, but was very very meticulous in combing the hair evenly into the pony tails. First at the back of my head … but his was more in the middle of the back of my head. Then he did the top of my head straight in the middle. He would then trim long bangs into this. It was great! I loved it and then all of a sudden he was no longer at the salon and I never found him again. I am not brave enough to try this myself.
I tried to do this myself last night. It was a moderate success. The only problem I had was cutting the top half of my hair. I ended up cutting it too short and so I didn’t quite get the right laying effect. Thankfully, it’s just hair and it will grow back. I’m going to wait 4 weeks and then I’m going to go to a curly hair salon so they can fix my mistake. So just be warned to take extra care when cutting the top half. Even with my little fumble, I like this haircut very much.
Hi!, im 16 and i seriously need to cut my dead ends off but ill have to wait another month to do it , so i wanted to do it myself. will this method work on layered short hair?
I have very thick, very coarse, very curly hair and am long overdue for a haircut. I stumbled upon this site while looking at samples of bob haircuts to show my hairdresser and am working up the courage to forgo the hairdresser and DIY instead. I used to cut my own hair in the 70’s when shags were all it but that was easy–just hack away the top and front. Time to haul the scissors out again!
One dumb question… Do you cut above the elastic (between the elastic and your head) or below the elastic (between the elastic and the ends of your hair)?
Thanks for posting. There’s obviously a clamor for your technique!
Below the elastic.
Sheryl, THANK YOU for your posts here in the WWW! I cut my hair today and love it! I have NEVER done this before! But we recently moved to the middle of the rain forest in Africa from America and needless to say, there are no salons here! My longer hair was making me sooooo hot, as we live right on the equator. I googled “how to cut my own curly bob” and walla! I found you! I video taped the whole thing today in small segments and will try to figure out how to post. In the mean time, thank you!!!!!
Sheryl, Thanks for your post! I was worried about cutting my very curly hair on my own. I didn’t think it could be done in two cuts. But I did it with a little help from my husband and it’s adorable! Thanks for your walk-thru.
Thanks for the post, Sheryl!! I started using this method earlier this year and love it! I’ve recommended it to a few other curlies I know. Again, thanks!!
I like you and most of the commenters here have been struggling with my curly hair all of my life. My hair had grown past my shoulders because I was too wary of going to yet another stylist who swears they know what they are doing with my texture of hair only to cut it so short that I have no choice than to straighten it only to have it end up looking fried over worked. I have never been a stranger to cutting my own hair I always snipped here and trimmed there in lieu of stylist trims for the above stated reasons. I googled “How to cut your own curly hair” and viola there you were. I read all of the comments and looked at the pictures and watched the video posted by a commenter and was so psyched to do it myself I ran upstairs and snipped away. I did it with dry hair, my hair poofs up a lot when it’s dry so I did not want to over do it the first try with wet hair. I was a little conservative my dry do barely brushes the tops of my shoulders now but the curls lie in nicely stacked layers and very flattering face framing waves and curls. Thanks for posting I may never pay for another hair cut again. Sorry there is no pic my phone died and my camera batteries are dead right now.
@Sue: Cut below the elastic!
I just did this method a week ago on my bsl 2b hair. I love it! Never got such a good cut from a salon. They just didn’t believe me when I told them to leave the front extra long. So naturally my bangs ended up above my eyes – uugh terrible.
Haha, no more. I’m my own salon now. 😀
Wow! I’m amazed and want to give this haircut a try. Has anyone posted here, though, who has very thick curly hair? I think I have enough thickness for 3 people, seriously. Will I need to have it thinned, also, to do this hairstyle? Also, like many of you have said, I, too, have never yet found any stylist who can make my curly thick hair work for me, so I just wear it up in a huge ponytail all of the time. I’m getting tired of it, though, and want something cute. Suggestions, anyone?
Your haircut is so cute! It looks great! 🙂
I use this basic idea but I don’t like bob cuts on myself personally so I go with a longer style. Same idea but I do it backwards, making the cut on top first. If you would like the front to frame your face simply move the ponytail to the front of your head. Cut all the hair to the length you would like the shortest part of the front frame to be. Remove the ponytail. This in itself creates a nice layered style but I like the back shorter than this achieves so I then part my hair down the middle all the way to the base of my hairline and pull the back around the sides and in front of my shoulders. Then I cut straight across at the desired length. To make sure the two sides are even I pull the parts closest to my chin together to the center. This cut creates a slightly curved u shape back instead of the harsh straight cut that never has looked right with my curls. I’ve found this cut frames my face nicely and creates the layers curls need! My first go at this took me about 20 minutes because I was nervous but since then it only takes me 10 at the very most. I will never let a stranger touch my hair again after finding how easy it is to do at home myself. Doing it myself actually came out better than the last time I paid for a haircut!
Thank you for getting the word out how easy it is to cut your own hair. To those of you still worried about trying it I suggest starting off with a longer style. It’s easier to cut more than it is to wait for it to grow back out! 🙂
Wow! I first thought no way… this has got to be a fake website. But after trying it on my daughter.. lol. I saw that it turned out AMAZINGLY CUTE!! So cute that I feel it is necessary to post a comment, saying thank you to all who tried before and posted video and pics and thank you Ms. Sheryl for sharing this vital info! I am now going to go home and try it on myself… I will surly post some pics when it is all said and done. Thank you for all of your help!! I would have paid alot of money for my daughters hair to look the way it does.
And I only did one part of the cut… I brushed her hair out in the shower, enhanced her natural part all the way down and brushed her hair accordingly.. right side down the right, left side down the left and back straight down. Then I put it in a pony tail and cut. It was a low pony tail, and I cut a little longer than I wanted it to actually be as I knew with the curls it was going to curl up.
With just one cut, it is the cutest it has ever been! And we have paid hundreds and different stylst! I only paid $40 for the sizzors!!
Could not have worked out better!
RE: Diane, my daughter has the thickest hair I have seen yet! She is only 8 and has enough for 3 people as well. A lady at Sally’s suggested that I should thin her hair.. but I did not want to buy that tool in addition to expensive sizzors.. And her hair turned out perfect!! It seems the thickness and curles add style and body She can still put it in a mini pony tail, but it is super cute just down… Which is what I want too.. Like you, I keep mine in a bun or ponytail all of the time and I am so sick of it too…
Advice: I would purchace some nice cutting sizzors, they seem to make a difference in how the hair looks and cuts, and with thicker hair it was nice to have a sharp pair. I did not get the most expensive as that went up into the $100’s but I did get one that was originally $50.. on sale for $40. Totally worth it. And now they are there for next time.
Kael wrote:
“I use this basic idea but I don’t like bob cuts on myself personally so I go with a longer style. Same idea but I do it backwards, making the cut on top first. If you would like the front to frame your face simply move the ponytail to the front of your head. Cut all the hair to the length you would like the shortest part of the front frame to be. Remove the ponytail. This in itself creates a nice layered style but I like the back shorter than this achieves so I then part my hair down the middle all the way to the base of my hairline and pull the back around the sides and in front of my shoulders. Then I cut straight across at the desired length. To make sure the two sides are even I pull the parts closest to my chin together to the center. This cut creates a slightly curved u shape back instead of the harsh straight cut that never has looked right with my curls. I’ve found this cut frames my face nicely and creates the layers curls need! My first go at this took me about 20 minutes because I was nervous but since then it only takes me 10 at the very most. I will never let a stranger touch my hair again after finding how easy it is to do at home myself. Doing it myself actually came out better than the last time I paid for a haircut!”
Kael, if you see this (I realize I’m responding long after you posted), could you post a picture of how your hair looks after you cut it your way? I’m curious to see it.
Thanks!
Sheryl,
Thank you for this post!
I’ve been wanting to cut off my long hair for years. Being aware that having curly hair could result in a bad haircut from a regular hairdresser (who would likely treat my hair just like straight hair), I was contemplating going to a hairdresser who specialises in cutting curly hair. It was going to be very expensive, and I wasn’t too keen on that (especially as it would have to become a regular expense if I was to maintain the bob).
I had been reading a forum about curly bobs (trying to get inspiration for my potential change of hairstyle), and someone there posted that they had just done a DIY curly bob haircut and showed a picture of the result. It looked fantastic. When I kept reading, there were other people who had also posted that they had cut their own curly bobs, and one of them gave a link to this post here. I read what you wrote, and decided to try it myself. I am very happy that I did!
The result is not too bad, I think, and I have been surprised by the large number of compliments I have received on the new cut. It is great that I can now cut my hair whenever I like and I don’t have to make an appointment at a salon or pay big $$$ for a cut. I now have the confidence to keep cutting my own hair, and tweaking the style to see what suits my face.
Thank you Sheryl!
Here is a pic (hopefully this works)… [[picture is no longer on Flickr – link removed]]
———————–
Edit from Sheryl: I added the picture (URLs in comments are now prohibited due to excessive blog spam. If you want to upload a picture of your haircut, please email me the link to the PICTURE (to the JPG or PNG) and I’ll upload it for you. If it’s Flickr, don’t just send the Flickr page, send the JPG URL. Here’s how to email me:
http://sherylcanter.com/contact.php
Edit from Sheryl (12-Apr-2015): Picture is no longer on Flickr so I removed the link.
I had to disable links due to the huge volume of blog spam I started receiving. You can send me the link to the photo through the Contact page, and I will upload it. Please be careful about typos:
http://sherylcanter.com/contact.php
Be sure to email me the link to the PICTURE itself (to the JPG or PNG). If it’s on Flickr, don’t just send the link to the Flickr page it’s on.
HaHA! Thank you for your post. I have a 22 mo daughter who desperately needed a haircut. I decided to try your approach because I knew she was not going to corporate in a stylists’ chair or in her high-chair for long…. It was quick and had great results with minimal trimming post pony tails. I was a little hesitant to try a drastic haircut like this on my own but boy are the results cute!
sorry about the typo. 😉
I wish my own curly hair was long enough to use your technique. I have so much gray that may or may not be as curly as other parts of my hair. I would appreciate any information you might have on keeping the curl even with gray hair.
I have very thick, curly hair that has gotten pretty long, so I put it in a ponytail all the time. I’m sick of it and want a new look, but I have had some really bad experiences with beauticians who don’t know how to cut thick curly hair, so I’m always afraid to have someone else cut it.. I always cut my hair myself in layers, but I really want a shorter look.. I started looking for ideas of how to easily cut it short and found your blog.. What a GREAT idea! Your hair cut is exactly what I’m hoping for. I’m going to try your method tomorrow morning, and thank you for posting it.. I also love the video the very brave young mom added.. After she cut it I thought, Oh no… that doesn’t look too good.. But once she showed it washed and curly, it looks awesome!!!
Thanks SO much!! This was so easy and took just a few minutes……….and saved $ 🙂 My hair looks great…..
Love it!!! I followed the instructions exactly, and Voila! the best hair cut this curly girl has ever had. And it was free and took about 5 minutes. I am digging my new do-it-yourself curly bob 🙂 The best part is, I will never have to step foot inside a hair salon again to fork over big bucks for yet another bad haircut. Thank you Sheryl. P.S. Why doesn’t everybody know about this???
Yay! Glad to hear it. 🙂
Thank you so much for this!
I followed your instructions, and it looks amazing.
I love it. It really works!
I only just found this…
I’m going to try tonight.
I have straight hair but plan to curl it afterwards with a heated tong.
I’ve never going that short before, so very nervous but also excited.
I have a question- when you cut the top pony tail do you cut it front to back or ear to ear?
Tried this tonight per your clearly written instructions. Perfect! Thanks a million.
Hi buddy,
I just did this myself and it was super easy!! No more trips to the salon for just a cut!! Thank you!!
Thanks. Homeplix
I just ordered a pair of thinning shears thinking that if I thin cut the hair below my cowlicks, on the top and sides of my head, it would help to hide them by putting the longer, uncut strands over top of them. Having read some articles I’m not sure now if I should do that. My hair is curly (apparently a 3) but shorter than yours. Too short to put it into pony tails. Due to the virus I haven’t been to a salon since January and look like a hag. I chopped off about 3 large chunks on either side of my head a few weeks ago and thanks to the curls it doesn’t show. I guess I was really fed up with it that day. Now I’m wondering, since the pony tail method won’t work for me, if pinning it into the 2 sections and facing them forward, as you did with the pony tails, will work. Since my hair is that much shorter though, making only 2 cuts might really show 2 cuts instead of looking layered? Now I’m wondering if I should use the thinning shears instead of scissors and be conservative in the amounts I cut? Do you have any suggestions for me?
Best advice ever! It’s Sept 2020, 85 degree weather day in and day out, can’t go to a salon, and my curly hair was driving me crazy and I needed to get it off of my neck. First I watched a complex video of a stylist cutting curly hair into a bob…way too difficult. Then I read your method, and thought, her hair looks just as great as what the stylist did! So I got out my scissors and in 5 minutes, I was done. Love it, thank you!
M.E. asked:
“I have a question- when you cut the top pony tail do you cut it front to back or ear to ear?”
I cut ear to ear. I’ve never tried front to back.
I’ll add two tips to my post:
1) Be very careful when putting the hair in the pony tail – try to do it as evenly as possible. Someone mentioned this in a comment, and it’s an important point.
2) You can experiment with exactly where to put the pony tail on the top or back of your head. At the base of your neck will blunt cut so all the layers are formed in the top cut. Higher up on the back of the head – for example, the middle of the back of the head – will create more layers (but is harder for a self-cutter to reach). For the top pony tail, the closer to your forehead, the more heavily layered (and shorter the front). The further back, the longer the layers (and front). I like to put the top pony tail right in the middle at the top of my head.
Karen Gordon:
I have never used thinning shears and don’t understand how they work, so I can’t comment on that.
If your hair is so short that you can’t pull pieces of it into a pony tail, then I doubt very much you “look like a hag”. That’s a very short haircut!
Hi Sheryl!
Another happy customer here. I’ve used your technique for a couple years now! I’ve done it at varying lengths, usually midneck or to shoulder. I used to be so terrified of getting my curly hair cut that I would agonize for months and come into the salon with a fat stack of reference photos. Those days are long past me! I’ve used your technique for taking off inches at a time or just a trim here and there.
I ran across you again recently when watching Alex: French Guy Cooking’s youtube video, ‘Can I Make my Wok Slicker than a Nonstick Pan ?’ As soon as I saw your picture, I exclaimed, “I know that hair!”
The internet is a strangely small place! Browsing through the comments that have been posted since I last visited this page, it’s amazing to see how your advice has been helping people for over a decade. Wow! Thank you so much!
Very cool. 🙂 Thanks for posting!
I’ve been using your method it’s simpler and easier than what I was using and your way makes it shorter which I like with my gray hair I’m pretty much all gray now and have never been happier with a hair cut even with cataracts and arthritis I can still manage and it’s better than any salon cut I’ve ever had thank you
THANK YOU! My curly haired daughter decided to go with a bob and this post really helped – it looks amazing! So. Simple.
This blog from Sheryl Canter offers a practical and straightforward guide on how to cut your own hair in a curly bob style. It’s a valuable resource for individuals looking for cost-effective and DIY hair care solutions, especially during challenging times when visiting a salon may not be an option.
Hi Sheryl
Just used your hair cutting technique and love the results! I have fine wavy hair but can make it curl more when I defuse it. No bad bad haircuts for me! Reading the reviews I can’t believe how many of us go to a salon and get a bad hair cut, I actually I thought I was the only one.
Thank for helping all of us who have used your technique